Your Ad Here

Monday, July 28, 2008

stty

Name

stty - change and print terminal line settings

Synopsis

stty [-F DEVICE] [--file=DEVICE] [SETTING]...
stty [-F DEVICE] [--file=DEVICE] [-a|--all]
stty [-F DEVICE] [--file=DEVICE] [-g|--save]

Description

Print or change terminal characteristics.

-a, --all
print all current settings in human-readable form
-g, --save
print all current settings in a stty-readable form
-F, --file=DEVICE
open and use the specified DEVICE instead of stdin
--help
display this help and exit
--version
output version information and exit

Optional - before SETTING indicates negation. An * marks non-POSIX settings. The underlying system defines which settings are available.

Special characters:

* dsusp CHAR
CHAR will send a terminal stop signal once input flushed
eof CHAR
CHAR will send an end of file (terminate the input)
eol CHAR
CHAR will end the line
* eol2 CHAR
alternate CHAR for ending the line
erase CHAR
CHAR will erase the last character typed
intr CHAR
CHAR will send an interrupt signal
kill CHAR
CHAR will erase the current line
* lnext CHAR
CHAR will enter the next character quoted
quit CHAR
CHAR will send a quit signal
* rprnt CHAR
CHAR will redraw the current line
start CHAR
CHAR will restart the output after stopping it
stop CHAR
CHAR will stop the output
susp CHAR
CHAR will send a terminal stop signal
* swtch CHAR
CHAR will switch to a different shell layer
* werase CHAR
CHAR will erase the last word typed

Special settings:

N
set the input and output speeds to N bauds
* cols N
tell the kernel that the terminal has N columns
* columns N
same as cols N
ispeed N
set the input speed to N
* line N
use line discipline N
min N
with -icanon, set N characters minimum for a completed read
ospeed N
set the output speed to N
* rows N
tell the kernel that the terminal has N rows
* size
print the number of rows and columns according to the kernel
speed
print the terminal speed
time N
with -icanon, set read timeout of N tenths of a second

Control settings:

[-]clocal
disable modem control signals
[-]cread
allow input to be received
* [-]crtscts
enable RTS/CTS handshaking
csN
set character size to N bits, N in [5..8]
[-]cstopb
use two stop bits per character (one with '-')
[-]hup
send a hangup signal when the last process closes the tty
[-]hupcl
same as [-]hup
[-]parenb
generate parity bit in output and expect parity bit in input
[-]parodd
set odd parity (even with '-')

Input settings:

[-]brkint
breaks cause an interrupt signal
[-]icrnl
translate carriage return to newline
[-]ignbrk
ignore break characters
[-]igncr
ignore carriage return
[-]ignpar
ignore characters with parity errors
* [-]imaxbel
beep and do not flush a full input buffer on a character
[-]inlcr
translate newline to carriage return
[-]inpck
enable input parity checking
[-]istrip
clear high (8th) bit of input characters
* [-]iutf8
assume input characters are UTF-8 encoded
* [-]iuclc
translate uppercase characters to lowercase
* [-]ixany
let any character restart output, not only start character
[-]ixoff
enable sending of start/stop characters
[-]ixon
enable XON/XOFF flow control
[-]parmrk
mark parity errors (with a 255-0-character sequence)
[-]tandem
same as [-]ixoff

Output settings:

* bsN
backspace delay style, N in [0..1]
* crN
carriage return delay style, N in [0..3]
* ffN
form feed delay style, N in [0..1]
* nlN
newline delay style, N in [0..1]
* [-]ocrnl
translate carriage return to newline
* [-]ofdel
use delete characters for fill instead of null characters
* [-]ofill
use fill (padding) characters instead of timing for delays
* [-]olcuc
translate lowercase characters to uppercase
* [-]onlcr
translate newline to carriage return-newline
* [-]onlret
newline performs a carriage return
* [-]onocr
do not print carriage returns in the first column
[-]opost
postprocess output
* tabN
horizontal tab delay style, N in [0..3]
* tabs
same as tab0
* -tabs
same as tab3
* vtN
vertical tab delay style, N in [0..1]

Local settings:

[-]crterase
echo erase characters as backspace-space-backspace
* crtkill
kill all line by obeying the echoprt and echoe settings
* -crtkill
kill all line by obeying the echoctl and echok settings
* [-]ctlecho
echo control characters in hat notation ('^c')
[-]echo
echo input characters
* [-]echoctl
same as [-]ctlecho
[-]echoe
same as [-]crterase
[-]echok
echo a newline after a kill character
* [-]echoke
same as [-]crtkill
[-]echonl
echo newline even if not echoing other characters
* [-]echoprt
echo erased characters backward, between '\' and '/'
[-]icanon
enable erase, kill, werase, and rprnt special characters
[-]iexten
enable non-POSIX special characters
[-]isig
enable interrupt, quit, and suspend special characters
[-]noflsh
disable flushing after interrupt and quit special characters
* [-]prterase
same as [-]echoprt
* [-]tostop
stop background jobs that try to write to the terminal
* [-]xcase
with icanon, escape with '\' for uppercase characters

Combination settings:

* [-]LCASE
same as [-]lcase
cbreak
same as -icanon
-cbreak
same as icanon
cooked
same as brkint ignpar istrip icrnl ixon opost isig icanon, eof and eol characters to their default values
-cooked
same as raw
crt
same as echoe echoctl echoke
dec
same as echoe echoctl echoke -ixany intr ^c erase 0177 kill ^u
* [-]decctlq
same as [-]ixany
ek
erase and kill characters to their default values
evenp
same as parenb -parodd cs7
-evenp
same as -parenb cs8
* [-]lcase
same as xcase iuclc olcuc
litout
same as -parenb -istrip -opost cs8
-litout
same as parenb istrip opost cs7
nl
same as -icrnl -onlcr
-nl
same as icrnl -inlcr -igncr onlcr -ocrnl -onlret
oddp
same as parenb parodd cs7
-oddp
same as -parenb cs8
[-]parity
same as [-]evenp
pass8
same as -parenb -istrip cs8
-pass8
same as parenb istrip cs7
raw
same as -ignbrk -brkint -ignpar -parmrk -inpck -istrip -inlcr -igncr -icrnl -ixon -ixoff -iuclc -ixany -imaxbel -opost -isig -icanon -xcase min 1 time 0
-raw
same as cooked
sane
same as cread -ignbrk brkint -inlcr -igncr icrnl -iutf8 -ixoff -iuclc -ixany imaxbel opost -olcuc -ocrnl onlcr -onocr -onlret -ofill -ofdel nl0 cr0 tab0 bs0 vt0 ff0 isig icanon iexten echo echoe echok -echonl -noflsh -xcase -tostop -echoprt echoctl echoke, all special characters to their default values.

Handle the tty line connected to standard input. Without arguments, prints baud rate, line discipline, and deviations from stty sane. In settings, CHAR is taken literally, or coded as in ^c, 0x37, 0177 or 127; special values ^- or undef used to disable special characters.

Sunday, July 20, 2008

A Visual Guide to Version Control

Version Control (aka Revision Control aka Source Control) lets you track your files over time. Why do you care? So when you mess up you can easily get back to a previous working version.

You’ve probably cooked up your own version control system without realizing it had such a geeky name. Got any files like this? (Not these exact ones I hope).

  • KalidAzadResumeOct2006.doc
  • KalidAzadResumeMar2007.doc
  • instacalc-logo3.png
  • instacalc-logo4.png
  • logo-old.png

It’s why we use “Save As”. You want the new file without obliterating the old one. It’s a common problem, and solutions are usually like this:

  • Make a single backup copy (Document.old.txt).
  • If we’re clever, we add a version number or date: Document_V1.txt, DocumentMarch2007.txt
  • We may even use a shared folder so other people can see and edit files without sending them over email. Hopefully they relabel the file after they save it.

So Why Do We Need A Version Control System (VCS)?

Our shared folder/naming system is fine for class projects or one-time papers. But software projects? Not a chance.

Do you think the Windows source code sits in a shared folder like “Windows2007-Latest-UPDATED!!”, for anyone to edit? That every programmer just works in a different subfolder? No way.

Large, fast-changing projects with many authors need a Version Control System (geekspeak for “file database”) to track changes and avoid general chaos. A good VCS does the following:

  • Backup and Restore. Files are saved as they are edited, and you can jump to any moment in time. Need that file as it was on Feb 23, 2007? No problem.
  • Synchronization. Lets people share files and stay up-to-date with the latest version.
  • Short-term undo. Monkeying with a file and messed it up? (That’s just like you, isn’t it?). Throw away your changes and go back to the “last known good” version in the database.
  • Long-term undo. Sometimes we mess up bad. Suppose you made a change a year ago, and it had a bug. Jump back to the old version, and see what change was made that day.
  • Track Changes. As files are updated, you can leave messages explaining why the change happened (stored in the VCS, not the file). This makes it easy to see how a file is evolving over time, and why.
  • Track Ownership. A VCS tags every change with the name of the person who made it. Helpful for blamestorming giving credit.
  • Sandboxing, or insurance against yourself. Making a big change? You can make temporary changes in an isolated area, test and work out the kinks before “checking in” your changes.
  • Branching and merging. A larger sandbox. You can branch a copy of your code into a separate area and modify it in isolation (tracking changes separately). Later, you can merge your work back into the common area.

Shared folders are quick and simple, but can’t beat these features.

Learn the Lingo

Most version control systems involve the following concepts, though the labels may be different.

Basic Setup

  • Repository (repo): The database storing the files.
  • Server: The computer storing the repo.
  • Client: The computer connecting to the repo.
  • Working Set/Working Copy: Your local directory of files, where you make changes.
  • Trunk/Main: The “primary” location for code in the repo. Think of code as a family tree — the “trunk” is the main line.

Basic Actions

  • Add: Put a file into the repo for the first time, i.e. begin tracking it with Version Control.
  • Revision: What version a file is on (v1, v2, v3, etc.).
  • Head: The latest revision in the repo.
  • Check out: Download a file from the repo.
  • Check in: Upload a file to the repository (if it has changed). The file gets a new revision number, and people can “check out” the latest one.
  • Checkin Message: A short message describing what was changed.
  • Changelog/History: A list of changes made to a file since it was created.
  • Update/Sync: Synchronize your files with the latest from the repository. This lets you grab the latest revisions of all files.
  • Revert: Throw away your local changes and reload the latest version from the repository.

Advanced Actions

  • Branch: Create a separate copy of a file/folder for private use (bug fixing, testing, etc). Branch is both a verb (”branch the code”) and a noun (”Which branch is it in?”).
  • Diff/Change/Delta: Finding the differences between two files. Useful for seeing what changed between revisions.
  • Merge (or patch): Apply the changes from one file to another, to bring it up-to-date. For example, you can merge features from one branch into another. (At Microsoft this was called Reverse Integrate and Forward Integrate)
  • Conflict: When pending changes to a file contradict each other (both changes cannot be applied).
  • Resolve: Fixing the changes that contradict each other and checking in the correct version.
  • Locking: “Taking control” of a file so nobody else can edit it until you unlock it. Some version control systems use this to avoid conflicts.
  • Breaking the lock: Forcibly unlocking a file so you can edit it. It may be needed if someone locks a file and goes on vacation (or “calls in sick” the day Halo 3 comes out).
  • Check out for edit: Checking out an “editable” version of a file. Some VCSes have editable files by default, others require an explicit command.

And a typical scenario goes like this:

Alice adds a file (list.txt) to the repository. She checks it out, makes a change (puts “milk” on the list), and checks it back in with a checkin message (”Added required item.”). The next morning, Bob updates his local working set and sees the latest revision of list.txt, which contains “milk”. He can browse the changelog or diff to see that Alice put “milk” the day before.

Visual Examples

This guide is purposefully high-level: most tutorials throw a bunch of text commands at you. I prefer to cover the high-level concepts without getting stuck in the syntax (the manual is always there, don’t worry). Sometimes it’s nice to see what’s possible.

Checkins

The simplest scenario is checking in a file (list.txt) and modifying it over time.

version control checkin

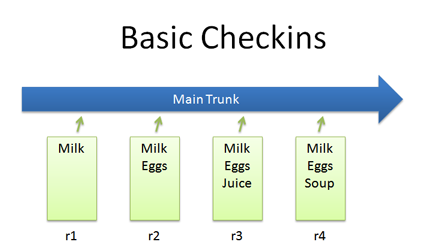
Each time we check in a new version, we get a new revision (r1, r2, r3, etc.).

svn add list.txt
(modify the file)
svn ci list.txt -m "Changed the list"

The -m flag is the message to use for this checkin.

Checkouts and Editing

In reality, you might not keep checking in a file. You may have to check out, edit and check in. The cycle looks like this:

version control checkout

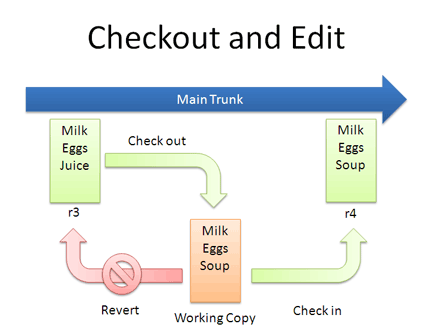
If you don’t like your changes and want to start over, you can revert to the previous version and start again (or stop). When checking out, you get the latest revision by default. If you want, you can specify a particular revision. In Subversion, run:


svn co list.txt (get latest version)
...edit file...
svn revert list.txt (throw away changes)

svn co -r2 list.txt (check out particular version)

Diffs

The trunk has a history of changes as a file evolves. Diffs are the changes you made while editing: imagine you can “peel” them off and apply them to a file:

version control diff

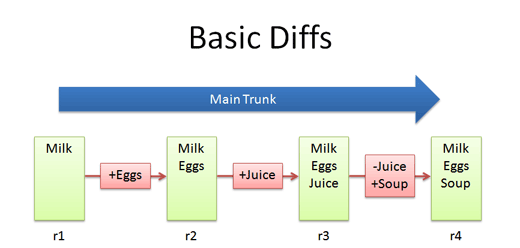
For example, to go from r1 to r2, we add eggs (+Eggs). Imagine peeling off that red sticker and placing it on r1, to get r2.

And to get from r2 to r3, we add Juice (+Juice). To get from r3 to r4, we remove Juice and add Soup (-Juice, +Soup).

Most version control systems store diffs rather than full copies of the file. This saves disk space: 4 revisions of a file doesn’t mean we have 4 copies; we have 1 copy and 4 small diffs. Pretty nifty, eh? In SVN, we diff two revisions of a file like this:

svn diff -r3:4 list.txt

Diffs help us notice changes (”How did you fix that bug again?”) and even apply them from one branch to another.

Bonus question: what’s the diff from r1 to r4?

+Eggs
+Soup

Notice how “Juice” wasn’t even involved — the direct jump from r1 to r4 doesn’t need that change, since Juice was overridden by Soup.

Branching

Branches let us copy code into a separate folder so we can monkey with it separately:

version control branch

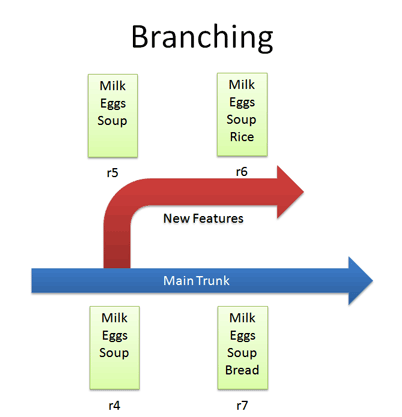
For example, we can create a branch for new, experimental ideas for our list: crazy things like Rice or Eggo waffles. Depending on the version control system, creating a branch (copy) may change the revision number.

Now that we have a branch, we can change our code and work out the kinks. (“Hrm… waffles? I don’t know what the boss will think. Rice is a safe bet.”). Since we’re in a separate branch, we can make changes and test in isolation, knowing our changes won’t hurt anyone. And our branch history is under version control.

In Subversion, you create a branch simply by copying a directory to another.

svn copy http://path/to/trunk http://path/to/branch

So branching isn’t too tough of a concept: Pretend you copied your code into a different directory. You’ve probably branched your code in school projects, making sure you have a “fail safe” version you can return to if things blow up.

Merging

Branching sounds simple, right? Well, it’s not — figuring out how to merge changes from one branch to another can be tricky.

Let’s say we want to get the “Rice” feature from our experimental branch into the mainline. How would we do this? Diff r6 and r7 and apply that to the main line?

Wrongo. We only want to apply the changes that happened in the branch!. That means we diff r5 and r6, and apply that to the main trunk:

version control merge

If we diffed r6 and r7, we would lose the “Bread” feature that was in main. This is a subtle point — imagine “peeling off” the changes from the experimental branch (+Rice) and adding that to main. Main may have had other changes, which is ok — we just want to insert the Rice feature.

In Subversion, merging is very close to diffing. Inside the main trunk, run the command:

svn merge -r5:6 http://path/to/branch

This command diffs r5-r6 in the experimental branch and applies it to the current location. Unfortunately, Subversion doesn’t have an easy way to keep track of what merges have been applied, so if you’re not careful you may apply the same changes twice. It’s a planned feature, but the current advice is to keep a changelog message reminding you that you’ve already merged r5-r6 into main.

Conflicts

Many times, the VCS can automatically merge changes to different parts of a file. Conflicts can arise when changes appear that don’t gel: Joe wants to remove eggs and replace it with cheese (-eggs, +cheese), and Sue wants to replace eggs with a hot dog (-eggs, +hot dog).

version control conflict

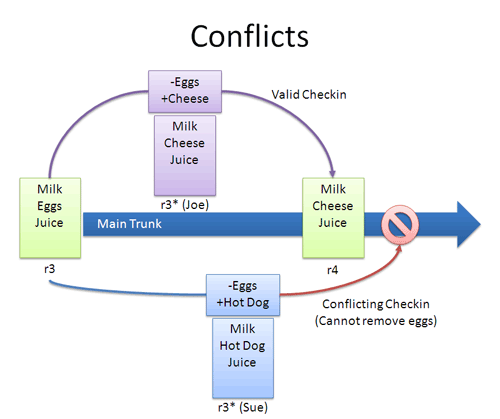
At this point it’s a race: if Joe checks in first, that’s the change that goes through (and Sue can’t make her change).

When changes overlap and contradict like this, the VCS may report a conflict and not let you check in — it’s up to you to check in a newer version that resolves this dilemma. A few approaches:

  • Re-apply your changes. Sync to the the latest version (r4) and re-apply your changes to this file: Add hot dog to the list that already has cheese.
  • Override their changes with yours. Check out the latest version (r4), copy over your version, and check your version in. In effect, this removes cheese and replaces it with hot dog.

Conflicts are infrequent but can be a pain. Usually I update to the latest and re-apply my changes.

Tagging

Who would have thought a version control system would be Web 2.0 compliant? Many systems let you tag (label) any revision for easy reference. This way you can refer to “Release 1.0″ instead of a particular build number:

version control tag

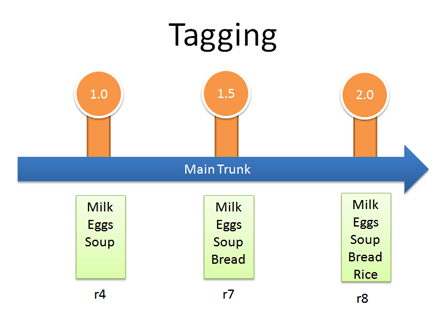
In Subversion, tags are just branches that you agree not to edit; they are around for posterity, so you can see exactly what your version 1.0 release contained. Hence they end in a stub — there’s nowhere to go.

(in trunk)
svn copy http://path/to/revision http://path/to/tag

Real-life example: Managing Windows Source Code

We guessed that Windows was managed out of a shared folder, but it’s not the case. So how’s it done?

  • There’s a main line with stable builds of Windows.
  • Each group (Networking, User Interface, Media Player, etc.) has its own branch to develop new features. These are under development and less stable than main.

You develop new features in your branch and “Reverse Integrate (RI)” to get them into Main. Later, you “Forward Integrate” and to get the latest changes from Main into your branch:

version control branch example

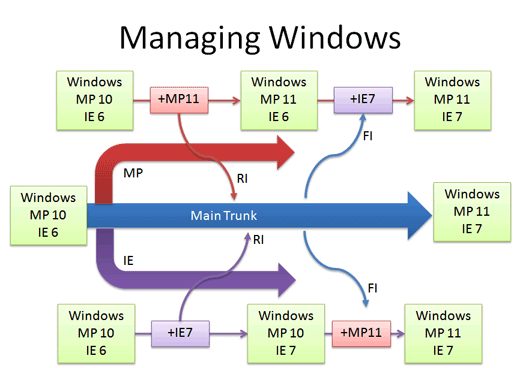
Let’s say we’re at Media Player 10 and IE 6. The Media Player team makes version 11 in their own branch. When it’s ready and tested, there’s a patch from 10 - 11 which is applied to Main (just like the “Rice” example, but a tad more complicated). This a reverse integration, from the branch to the trunk. The IE team can do the same thing.

Later, the Media Player team can pick up the latest code from other teams, like IE. In this case, Media Player forward integrates and gets the latest patches from main into their branch. This is like pulling in the “Bread” feature into the experimental branch, but again, more complicated.

So it’s RI and FI. Aye aye. This arrangement lets changes percolate throughout the branches, while keeping new code out of the main line. Cool, eh?

In reality, there’s many layers of branches and sub-branches, along with quality metrics that determine when you get to RI. But you get the idea: branches help manage complexity. Now you know the basics of how one of the largest software projects is organized.

Key Takeaways

My goal was to share high-level thoughts about version control systems. Here are the basics:

  • Use version control. Seriously, it’s a good thing, even if you’re not writing an OS. It’s worth it for backups alone.
  • Take it slow. I’m only now looking into branching and merging for my projects. Just get a handle on using version control and go from there. If you’re a small project, branching/merging may not be an issue. Large projects often have experienced maintainers who keep track of the branches and patches.
  • Keep Learning. There’s plenty of guides for SVN, CVS, RCS, Git, Perforce or whatever system you’re using. The important thing is to know the concepts and realize every system has its own lingo and philosophy. Eric Sink has a detailed version control guide also.

These are the basics — as time goes on I’ll share specific lessons I’ve learned from my projects. Now that you’ve figured out a regular VCS, try an illustrated guide to distributed version control.

Saturday, July 19, 2008

What is CMMI?

CMMI Information Sources | Worldwide Adoption
Benefits of Process Improvement | Benefits of CMMI

Capability Maturity Model® Integration (CMMI) is a process improvement approach that provides organizations with the essential elements of effective processes. It can be used to guide process improvement across a project, a division, or an entire organization. CMMI helps integrate traditionally separate organizational functions, set process improvement goals and priorities, provide guidance for quality processes, and provide a point of reference for appraising current processes.

This page points you to places where you can find more information about CMMI, and describes the worldwide adoption and benefits of CMMI.

CMMI Information Sources

Before you begin applying CMMI to your organization, collect information about it. The CMMI Overview presentation provides a good summary of CMMI, and the Adoption page is a good starting point for finding information most relevant to your situation.

The CMMI Version 1.2 Overview presentation introduces CMMI and can help you make decisions about your process improvement plans. You also can use this presentation to inform others in your organization about CMMI.

The Adoption page contains information about CMMI-related conferences and events, online forums, presentations, mappings, and written publications. Consider bookmarking the Getting Started and Adoption pages to help you develop your process improvement program.


Worldwide Adoption

The SEI is excited about the response that organizations around the world are having to the CMMI Product Suite. CMMI is being adopted worldwide, including North America, Europe, Asia, Australia, South America, and Africa. This kind of response has substantiated the SEI's commitment to the CMMI models and the Standard CMMI Appraisal Method for Process Improvement (SCAMPISM).

SCAMPI incorporates the best ideas of several process-improvement appraisal methods. The SCAMPI Class A method is being used successfully by many organizations. The emerging SCAMPI Class B and Class C methods will extend the suite of SCAMPI methods. For more information about SCAMPI, see CMMI Appraisals.


Benefits of Process Improvement

The following are some of the benefits and business reasons for implementing process improvement:

  • The quality of a system is highly influenced by the quality of the process used to acquire, develop, and maintain it.
  • Process improvement increases product and service quality as organizations apply it to achieve their business objectives.
  • Process improvement objectives are aligned with business objectives.

CMMI Benefits

The CMMI Product Suite is at the forefront of process improvement because it provides the latest best practices for product and service development and maintenance. The CMMI models improve the best practices of previous models in many important ways. CMMI best practices enable organizations to do the following:

  • more explicitly link management and engineering activities to their business objectives
  • expand the scope of and visibility into the product lifecycle and engineering activities to ensure that the product or service meets customer expectations
  • incorporate lessons learned from additional areas of best practice (e.g., measurement, risk management, and supplier management)
  • implement more robust high-maturity practices
  • address additional organizational functions critical to their products and services
  • more fully comply with relevant ISO standards

Friday, July 4, 2008

DM-CRYPT info

Introduction

dmcrypt is a way of encrypting and decrypting files using a cryptographic cipher. dmcrypt allows you to access these files like a normal block device, dmcrypt is designed to be put on a block device but with a loopback device we can easily avoid the need for a separate partition.

There are other ways to encrypt files such as Cryptoloop (deprecated, less secure and uncleanly coded) or loopaes (more secure and faster, but harder to use)

Security Issue

As for every other hard drive encryption mechanism, the encryption key is stored in RAM to allow dm-crypt to encrypt/decrypt the data. Therefore the security of the key relies on the security of the RAM.

Recently some researchers have found that, under certain conditions, it is possible to retrieve this key, even if the system is shutdown.

See: http://citp.princeton.edu/memory/

A work around would be to always shut-down your system properly, and stay around for a while to ensure that nobody is playing with your computer. For the more paranoid ones, you can also take the RAM on your pocket, making the key effectively inaccessible.

You have to remember that hard-drive encryption is only effective when the corresponding partition is unmounted. An encrypted partition which is always mounted is as secure as a clear partition, as one may access each of them the same way.

Loopback or partition?

A loopback means that you have a file that is on a partition that you then mount using a special device called a loopback. The loop device then acts as a normal block device transforming your file into just another hard disk :)

This is useful if for example you wish to store all your ssh keys safely but don't want to have to make another partition for it!

Configuring your kernel for dmcrypt

You must configure your kernel to be able to use dmcrypt. Use your favourite kernel or emerge development-sources.

cd /usr/src/linux
make menuconfig

You must first enable the device mapper (dm):

Linux Kernel Configuration: Device Mapper
Device Drivers -->
[*] Multiple devices driver support (RAID and LVM)
<*> Device mapper support
<*> Crypt target support

Then you must enable the cipher (aes):

Cryptographic API -->
<*> AES cipher algorithims (i586)

If you're going to be using dmcrypt on a loopback file, not a partition:

Device Drivers --> Block Devices -->
<*> Loopback device support # Remember, cryptoloop is not dmcrypt

If you wish you may enable all of the above as modules, but you must then modprobe them.

Now compile your kernel:

 make && make modules_install

Now inform your bootloader of this change and reboot (or if you compiled them all as a module and do it right you can just modprobe)

Installing the tools needed

emerge sys-fs/cryptsetup

Thursday, July 3, 2008

How to use Cryptsetup with LUKS support

This is a short howto to describe the basic usage of Device-Mapper, DM-Crypt, and Cryptsetup to mount and use encrypted partitions and container files.

This is partially in response to the recent articles about the numbers of USB flash thumbdrives that are regularly lost. If we learn to use encryption then that statistic is just sad but not worrying. (see The problem of lost USB flash thumbdrives)

Background


Device Mapper and DM-Crypt

Starting in version 2.6, the Linux kernel started providing the Device-Mapper interface. This interface allowed for the creation of layers of virtual block devices ontop of real block devices. These devices are used for things like RAID formats, snapshot or encryption. The DM-Crypt is the module for Device-Mapper that provides access to the cryptographic functions.

Cryptsetup

Cryptsetup is the primary userland tool for creating and managing encrypted partitions and containers for DM-Crypt.

Linux Unified Key Setup (LUKS)

LUKS provides a standard on-disk format for encrypted partitions to facilitate cross distribution compatability, to allow for multiple users/passwords, effective password revocation, and to provide additional security against low entropy attacks. To use LUKS, you must use an enabled version of cryptsetup. To the authors knowledge currently only Debian (Etch, Lenny and Sid), Ubuntu and Gentoo offer LUKS enabled versions of cryptsetup in their repositories.

Creating a New Encrypted Container File or Partition


Create the Container and Loopback Mount it

First we need to create the container file, and loopback mount it.

root@host:~$  dd if=/dev/urandom of=testfile bs=1M count=10
10+0 records in
10+0 records out
10485760 bytes (10 MB) copied, 1.77221 seconds, 5.9 MB
root@host:~$ losetup /dev/loop/0 testfile
root@host:~$
Note: Skip this step for encrypted partitions.
luksFormat

Before we can open an encrypted partition, we need to initialize it.

root@host:~$ cryptsetup luksFormat /dev/loop/0

WARNING!
========
This will overwrite data on /dev/loop/0 irrevocably.

Are you sure? (Type uppercase yes): YES
Enter LUKS passphrase:
Verify passphrase:
Command successful.
root@host:~$
Note: For encrypted partitions replace the loopback device with the device label of the partition.
luksOpen

Now that the partition is formated, we can create a Device-Mapper mapping for it.

root@host:~$ cryptsetup luksOpen /dev/loop/0 testfs
Enter LUKS passphrase:
key slot 0 unlocked.
Command successful.
root@host:~$
Formating the Filesystem

The first time we create the Device-Mapper mapping, we need to format the new virtual device with a new filesystem.

root@host:~$ mkfs.ext2 /dev/mapper/testfs
mke2fs 1.39-WIP (09-Apr-2006)
Filesystem label=
OS type: Linux
Block size=1024 (log=0)
Fragment size=1024 (log=0)
2432 inodes, 9724 blocks
486 blocks (5.00%) reserved for the super user
First data block=1
2 block groups
8192 blocks per group, 8192 fragments per group
1216 inodes per group
Superblock backups stored on blocks:
8193

Writing inode tables: done
Writing superblocks and filesystem accounting information: done

This filesystem will be automatically checked every 34 mounts or
180 days, whichever comes first. Use tune2fs -c or -i to overri
root@host:~$
Mounting the Virtual Device

Now, we can mount the new virtual device just like any other device.

root@host:~$ mount /dev/mapper/testfs /mnt/test/
root@host:~$

Mounting an Existing Encrypted Container File or Partition

root@host:~$ losetup /dev/loop/0 testfile
root@host:~$ cryptsetup luksOpen /dev/loop/0 testfs
Enter LUKS passphrase:
key slot 0 unlocked.
Command successful.
root@host:~$ mount /dev/mapper/testfs /mnt/test/
root@host:~$
Note: Skip the losetup setup for encrypted partitions.

Unmounting and Closing an Encrypted Container File or Partition


root@host:~$ umount /mnt/test
root@host:~$ cryptsetup luksClose /dev/mapper/testfs
root@host:~$ losetup -d /dev/loop/0
root@host:~$
Note: Skip the losetup setup for encrypted partitions.

Handling Multiple Users and Passwords


The LUKS header allows you to assign 8 different passwords that can access the encyrpted partition or container. This is useful for environments where the CEO & CTO can each have passwords for the device and the administrator(s) can have another. This makes it easy to change the password in case of employee turnover while keeping the data accessible.

Adding passwords to new slots
root@host:~$ cryptsetup luksAddKey /dev/loop/0
Enter any LUKS passphrase:
Verify passphrase:
key slot 0 unlocked.
Enter new passphrase for key slot:
Verify passphrase:
Command successful.
root@host:~$
Deleting key slots
root@host:~$ cryptsetup luksDelKey /dev/loop/0 1
Command successful.
root@host:~$

Displaying LUKS Header Information

root@host:~$ cryptsetup luksDump /dev/loop/0
LUKS header information for /dev/loop/0

Version: 1
Cipher name: aes
Cipher mode: cbc-essiv:sha256
Hash spec: sha1
Payload offset: 1032
MK bits: 128
MK digest: a9 3c c2 33 0b 33 db ff d2 b9 dc 6c 01 d6 90 48 1d c1 2e bb
MK salt: 98 46 a3 28 64 35 f1 55 f0 2b 8e af f5 71 16 64
3c 30 1f 6c b1 4b 43 fd 23 49 28 a6 b0 e4 e2 14
MK iterations: 10
UUID: 089559af-41af-4dfe-b736-9d9d48d3bf53

Key Slot 0: ENABLED
Iterations: 254659
Salt: 02 da 9c c3 c7 39 a5 62 72 81 37 0f eb aa 30 47
01 1b a8 53 93 23 83 71 20 03 1b 6c 90 84 a5 6e
Key material offset: 8
AF stripes: 4000
Key Slot 1: DISABLED
Key Slot 2: DISABLED
Key Slot 3: DISABLED
Key Slot 4: DISABLED
Key Slot 5: DISABLED
Key Slot 6: DISABLED
Key Slot 7: DISABLED
root@host:~$

Wednesday, July 2, 2008

Encrypt disk

If you want to encrypt the complete disk, you need
*Kernel >=2.6.4 (>=2.6.10 for better security)
*BLK_DEV_DM and DM_CRYPT options enabled in the kernel
*cryptsetup utility

/dev/sda being your usb key:

Verify disk and put random data (for security on known clear text attacks):
Code:
/sbin/badblocks -s -w -t random -v /dev/sda
dd if=/dev/urandom of=/dev/sda
Format the key with ext2 filesystem encrypted using luks, password is asked:
Code:
luksformat -t ext2 /dev/sda
Create a mount point where your decrypted disk will be mounted:
Code:
mkdir /media/cdisk1
Its more coherent with the rest of the howto if you put it in /media. Also media is the standard for removable media (its not supposed to be always mounted)


Link it with a device mapper, put this in /etc/fstab:
Quote:
/dev/mapper/cdisk1 /media/cdisk1 ext2 noauto,defaults 0 0
Tell the system that /dev/sda is to be linked with /dev/mapper/cdisk1, put this in /etc/crypttab:
Quote:
cdisk1 /dev/sda none luks,timeout=10
Mount it with the next command, password is asked:
Code:
cryptsetup luksOpen /dev/sda cdisk1
mount /media/cdisk1
To unmount and remove the mapping:
Code:
 umount /media/cdisk1
cryptsetup luksClose cdisk1
Customization:
On next reboot, /etc/init.d/cryptdisks (in case it is installed by cryptsetup) will look in /etc/crypttab, ask you for the password and mount the disk in /media/cdisk1

Alternatively to mount it you can use pmount. The first argument is the partition or disk, the second is a label you choose (it can be different from above)
Code:
pmount /dev/sda supa_crypt
pmount will try to guess the filesystem and as it knows luks (because luks is a standard), will mount the disk in /media/supa_crypt
To use pmount on a non-removable media (eg. /dev/hda6 below), you have to allow this device to be "pmounted":
Quote:
Originally Posted by pmount.allow
# /etc/pmount.allow
# pmount will allow users to additionally mount all devices that are
# listed here.
/dev/hda6

If your HAL and udev is configured correctly and your Window manager is HAL-aware, just plug in the usb key and a popup appears to ask you the password. (the media will be mounted in /media/sda in this case, the label is the partition name)

LUKS - Linux Unified Key Setup

What the ..?

LUKS is the upcoming standard for Linux hard disk encryption. By providing a standard on-disk-format, it does not only facilitate compatibility among distributions, but also provide secure management of multiple user passwords. In contrast to existing solution, LUKS stores all setup necessary setup information in the partition header, enabling the user to transport or migrate his data seamlessly.

While LUKS is a standard on-disk format, there is also a reference implementation. LUKS for dm-crypt is implemented in an enhanced version of cryptsetup.

Design

LUKS was designed according to TKS1, a template design developed in [TKS1] for secure key setup. LUKS closely reassembles the structure recommended in the TKS1 paper, but also adds meta data for cipher setup management and LUKS also supports for multipe keys/passphrases.

Why LUKS?

  • compatiblity via standardization,
  • secure against low entropy attacks,
  • support for multiple keys,
  • effective passphrase revocation,
  • free

How to get LUKS?

There are several sub project, trying to bring LUKS to your desktop. Most efforts concentrate or built apon cryptsetup-luks, a LUKSified version of cryptsetup. cryptsetup is used to conveniantely setup dm-crypt managed block devices under Linux. cryptsetup-luks is a superset in terms of functionality, adding all necessary operation to enable the user to manage a LUKS partition. This effort is further documented under LUKS on dm-crypt.

LUKS on Gentoo uses cryptsetup-luks to make Gentoo the first Linux distribution that can be run and installed seamlessly with LUKS, and (without disrespect of other crypto project) is believed to deliver the best user experience.

LUKS is the first cross-plattform standard for transparent hard disk encryption. Thanks to FreeOTFE, you get LUKS for Win32. Of course, you have to use a file-system on your LUKS partition that both OS understand. For instance, fat. For more compatibility stuff see, LUKS for the masses.

Help!

For LUKS related questions, please use the dm-crypt mailing list, dm-crypt@saout.de. If you want to subscribe just send an empty mail to dm-crypt-subscribe@saout.de. You can also mail me in private, althought I prefer to use the public and archived mailing list.

Tuesday, July 1, 2008

dm-crypt

Device-mapper is a new infrastructure in the Linux 2.6 kernel that provides a generic way to create virtual layers of block devices that can do different things on top of real block devices like striping, concatenation, mirroring, snapshotting, etc... The device-mapper is used by the LVM2 and EVMS 2.x tools.

dm-crypt is such a device-mapper target that provides transparent encryption of block devices using the new Linux 2.6 cryptoapi. The user can basically specify one of the symmetric ciphers, a key (of any allowed size), an iv generation mode and then he can create a new block device in /dev. Writes to this device will be encrypted and reads decrypted. You can mount your filesystem on it as usual. But without the key you can't access your data.

It does basically the same as cryptoloop only that it's a much cleaner code and better suits the need of a block device and has a more flexible configuration interface. The on-disk format is also compatible. In the future you will be able to specify other iv generation modes for enhanced security (you'll have to reencrypt your filesystem though).